
Creating a Montessori-style activity wall for your child is an excellent way to foster independent learning, fine motor skills, and sensory development.
Montessori principles emphasize hands-on learning and exploration, making an activity wall a perfect addition to your child’s play area.
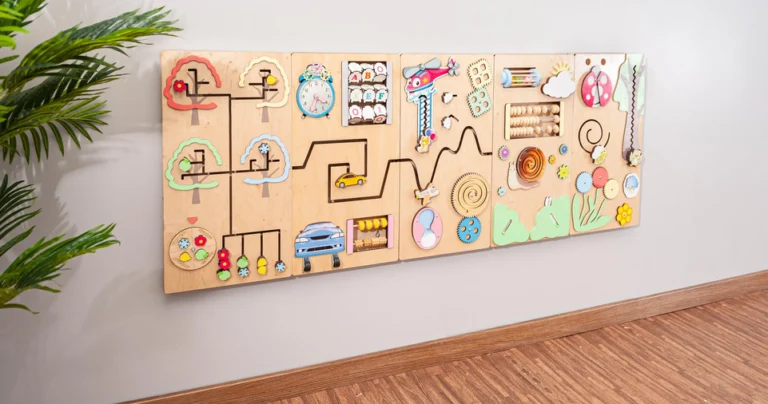
An activity wall is a multi-functional setup that can be customized to match your child’s unique learning needs and interests.
This guide will walk you through the steps of designing, building, and personalizing an engaging activity wall that aligns with Montessori values while keeping safety, creativity, and developmental benefits in mind.
By incorporating the right elements, you can create a learning space that grows with your child and provides endless opportunities for exploration and discovery.
Why a Montessori-Style Activity Wall?
Montessori-style learning focuses on self-directed activities that promote problem-solving and cognitive growth. An activity wall provides:
- Hands-on Exploration: Encourages children to engage with different textures, shapes, and objects, promoting sensory learning.
- Fine Motor Development: Activities like twisting, turning, pressing, and pulling help build dexterity and hand-eye coordination.
- Cognitive Growth: Problem-solving elements such as shape sorting and mazes help improve reasoning and logic skills.
- Independent Play: Fosters a sense of autonomy and confidence as children interact with their environment at their own pace.
- Encourages Creativity: With open-ended activities like chalkboards and magnetic boards, children can freely express themselves and explore their imagination.
- Multi-Sensory Engagement: Different textures, colors, and materials help stimulate visual, auditory, and tactile senses.
Planning Your Activity Wall
Before starting, consider the following:
- Age-Appropriateness: Ensure activities match your child’s developmental stage and abilities.
- Safety: Use non-toxic, child-friendly materials and securely mount all components to prevent hazards.
- Space Availability: Choose a dedicated wall or panel that fits well in your home and allows ample space for interaction.
- Theme and Design: Select a color scheme or theme that aligns with your child’s interests, such as nature, space, or animals.
- Adjustability: Consider making elements modular so that you can change or upgrade components as your child grows.
- Interactive Components: Incorporate elements that provide different learning experiences, such as light-up features, sounds, or puzzle-solving stations.
ALSO READ:How to Create a Drama Space with Props and Costumes for Kids
Materials You’ll Need
| Material | Purpose |
|---|---|
| Wooden Board or Panel | Base structure for mounting activities |
| Velcro Strips | Easy attachment for interchangeable activities |
| Screws and Anchors | Secure wall installation |
| Chalkboard or Whiteboard | Drawing and writing surface |
| Fabric Swatches | Sensory exploration |
| Locks, Latches, and Knobs | Fine motor skill development |
| Mirrors | Self-awareness and exploration |
| Gears and Pulleys | Mechanical learning and cause-effect understanding |
| Magnetic Board | Letter, number, and shape learning |
| Bells or Musical Elements | Auditory stimulation |
| LED Light Panels | Visual stimulation and engagement |
| Puzzle Boards | Problem-solving and cognitive skill development |
| Bead Mazes | Hand-eye coordination and dexterity improvement |
Step-by-Step Guide to Building an Activity Wall

Step 1: Choose a Location
Pick a safe, accessible area such as a playroom, nursery, or hallway. Ensure there’s enough space for your child to stand and interact comfortably. If you want a portable option, consider using a large wooden panel that can be moved as needed.
Step 2: Prepare the Base
- Use a sturdy wooden board if you prefer a removable activity wall.
- Sand the surface to remove rough edges and apply a non-toxic sealant for durability.
- Securely mount it to the wall using screws and anchors if it’s a permanent fixture.
- Paint or decorate the background to make the wall more engaging.
Step 3: Select Engaging Activities
Choose a mix of tactile, interactive, and cognitive activities:
- Sensory Panels: Incorporate textures like sandpaper, velvet, and bubble wrap for tactile exploration.
- Fine Motor Stations: Install knobs, latches, and zippers to enhance dexterity.
- Writing and Drawing Spaces: Use chalkboards, whiteboards, or magnetic boards to encourage creative expression.
- Musical Elements: Add xylophone bars, bells, or shakers for auditory engagement.
- STEM Learning Activities: Introduce gears, pulleys, and simple mechanical setups to teach engineering basics.
- Interactive LED Lights: Install touch-sensitive LED lights that respond to movement for an engaging experience.
- Hidden Compartments: Create small doors with surprises inside to foster curiosity.
- Sorting Games: Magnetic shapes or color-coded puzzles to promote logical thinking.
Step 4: Securely Attach Components
Use screws, strong adhesive, or Velcro to fasten objects securely. Test each component to ensure safety and durability. For elements that require frequent changes, Velcro strips provide an easy swap-out option.
Step 5: Encourage Exploration
Introduce the wall to your child and let them explore freely. Observe what interests them most and adjust activities accordingly. Encourage independent play while being available for support when needed.
Case Studies: Montessori Activity Walls in Action
| Scenario | Solution | Outcome |
|---|---|---|
| Toddler Struggling with Fine Motor Skills | Added zippers, buttons, and latches | Improved dexterity and confidence |
| Child Interested in Music | Installed a xylophone panel | Enhanced creativity and auditory skills |
| Preschooler Learning Letters | Magnetic letters and chalkboard | Boosted letter recognition and early writing |
| Sensory-Seeking Child | Different textures and shapes | Increased sensory engagement and focus |
| Child Learning Cause & Effect | Included gears and pulleys | Developed problem-solving skills |
| Visually Stimulated Child | LED light panel and touch-sensitive buttons | Enhanced visual engagement and curiosity |
| Child Developing Social Skills | Interactive components for cooperative play | Encouraged collaboration and sharing |
Tips for Maintaining an Activity Wall

- Regularly Rotate Activities: Keep engagement levels high by switching out components periodically.
- Check for Safety: Tighten loose parts and replace worn-out elements to ensure durability.
- Observe Your Child’s Interests: Adapt the wall based on evolving skills and curiosity.
- Make It Expandable: Leave room for growth by designing the wall in a way that allows additional elements to be added over time.
- Ensure Multi-Sensory Experiences: Incorporate elements that engage different senses, from sound and touch to sight and motion.
ALSO READ:How to Make Your Own Sensory Bins for Early Learning
Conclusion
A Montessori-style activity wall is a fantastic way to encourage hands-on learning, creativity, and independence. By integrating a variety of tactile, visual, and cognitive elements, you can create a personalized learning space that evolves with your child’s development. With the right planning and materials, you can design an engaging and educational experience that will captivate your little one for years to come. Start designing today and watch your child explore, learn, and thrive!
Call-to-Action (CTA)
Thinking about making a Montessori activity wall for your child? Share your ideas or completed projects in the comments below! If you found this guide helpful, pass it along to other parents and educators.


